
The order, nuances and cost of installation of Stretch ceilings
Installation of stretch ceilings - the most simple and inexpensive way to bring the ceiling in order and give the apartment a neat appearance. Also this is the most "clean" and fastest option, since installation does not take much time and does not create any confusion. A variety of materials, textures and shades of stretch ceilings can organically fit them into any interior.
Features of Stretch Ceiling installation
Simplicity of installation is one of the main advantages of stretch ceilings. When they are installed, neither dust nor dirt is generated, you do not have to clean up after the masters work. In addition, the whole process does not take much time. The duration of the installation of a stretch ceiling depends on the size of the room, the complexity of its geometry:
- the presence of additional angles and alcoves;
- the presence of pipes and protrusions;
- number of lamps;
- the complexity of the ceiling design itself - it is obvious that the usual ceiling mount faster than the multi-level.
On average, the installation of a stretch ceiling in a square or rectangular room of 15-20 m2 occupies 2-4 hours. If you want to install several luminaires, keep in mind that arranging a point for each of them will increase the installation time of the stretch ceiling by about 20 minutes. In rooms with high (above 3 meters) ceilings, things can go a little slower: in such rooms, the installation time increases by about 2 hours. Installation of complex multi-level structures requires great skill and time, their installation in a room of 15-20 m2 can require 8-10 hours of operation. Stretch ceiling is easy to install, but nevertheless, its installation is better to entrust to professionals, because in this business there are so many important trifles.
Necessary equipment and components
Stages of installation of stretch ceilings
- Measurements, which are carried out when ordering a stretch ceiling.
- The accuracy of measurements is a necessary condition for a quality installation, a person without experience and special equipment is unlikely to be able to measure all parameters independently. And there is no need for this: companies that are engaged in installing stretch ceilings, offer such a service for free.
- Delivery of pre-cut linen to the object.
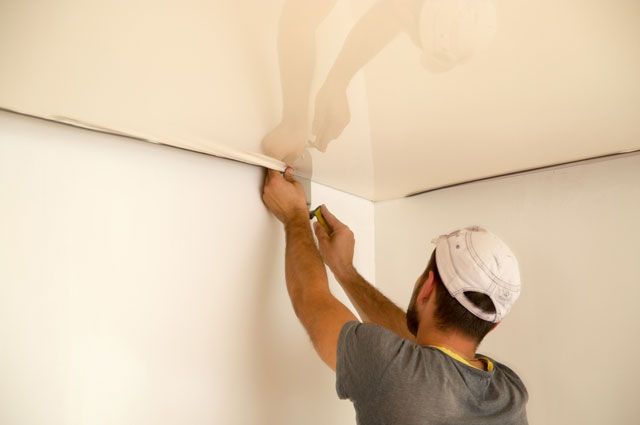
- Marking of places of fastening of a profile on walls.
- Preparation of the canvas. The film is heated with a heat gun and expanded (this stage is absent in the installation of tissue cloths).
- Actually installation. The canvas is fixed on the baguette at the corners, stretched diagonally, heated with a heat gun, and filled in a baguette around the perimeter.
This is a basic technology. If a multi-level construction is supposed to be installed, a frame is first created, then the panels are stretched. This is a much more complex and lengthy process.
Even more difficult to install a stretch ceiling "starry sky." Such ceilings are very beautiful, but difficult from the technological point of view. The effect of flickering stars is provided through the use of LEDs or optical fibers. To create such ceilings under the canvas, it is necessary to equip the niche for the generator and the platform on which the fiber strands will be placed - it is often made of thin plywood on a frame. After the web is stretched through special holes, the threads are pulled out and cut flush with the web. Everything is done by hand, and this is truly a jeweler's job. "Starry sky" from LEDs is a bit simpler - the lamps are attached to the base with special silicone glue. Then the ceiling is stretched from the special light-transmitting film.
Certain features are also in the installation of stretch ceilings in large rooms. To prevent the canvas from sagging, the wizard mounts additional stiffeners. The very fabric in such cases will have a weld, because the width of the film is limited. However, this seam is almost invisible and sometimes even the owner of the apartment can not say exactly where he goes.
In the process of fixing the profile it is necessary to observe a number of rules:
- Give preference to products made of aluminum. Their advantages - increased strength and ease of fixation. As for the PVC profile, it is better to abandon it;
- Modern profiles can be fixed both on walls and on the ceiling;
- if there is a desire to install an incandescent fixture, the fixation of the profile should be made at a distance of 7-9 centimeters from the base ceiling;
- The mounting of the profile to the wall should be made every 20-25 centimeters. But this is provided that the surface is strong. Otherwise, the above parameter should be reduced to 6-10 centimeters. Otherwise, the tensioning sheet can pull the profile out of the wall;
- In a room with a large number of partitions, installation of the profile is carried out by a simple procedure. Marking is done using a special level (water or laser). Once the measurements have been made, holes are drilled with a perforator, after which the screws are screwed in. Often newcomers use fisher from a tree, but this is a mistake. In a few years they can dry up and will not be able to hold the tension of the canvas.
Note!
Technological nuances of the process
Harpoon technology
Wedge technology
Clip technology
Our Experts advices
- To prevent the ceiling from getting dirty during other repair and finishing works, it should be installed last, literally before the furniture is arranged.
- In advance, consider the lighting scheme. It is best if the fixtures are installed on the same day as the ceiling, because companies that are engaged in electrical work do not always have masters who can work with suspended ceilings. You can install a luminaire on such a ceiling at any time, but if a person does not have experience, the result may not turn out very beautiful.
- Between the ceiling and the ceiling can form a condensation, spoiling the canvas. To avoid this, special ventilation holes are made in the ceiling. If the area of the room is large (more than 35 sq. M.), It will not only require a hole, but a ventilation grille.
- Stretch ceilings make certain requirements for lighting sources. Do not use too bright and powerful lamps: from constant heating, some types of ceilings are deformed and change colour. The power of ordinary lamps should be less than 60 W, halogen - less than 25 W.
- Stretch ceiling can carry not only an aesthetic, but also a practical function - for example, to provide sound insulation. A soundproofing material is offered by European manufacturers only.
- Stretch ceiling does not have to be white - the choice of colors is huge, from pastel to dark and saturated. Selecting a shade, sensibly estimate features of a room. Ceilings of bright colors can visually reduce the room, for apartments with low ceilings more suitable canvas light colors.
- Glossy ceilings visually increase the height of the room. This is an excellent option for rooms with low ceilings. But be careful when installing such ceilings in narrow spaces, for example in a corridor. Due to the reflection effect, distortion of proportions may occur and the room will appear to be high, but even narrower.
Installation Diagram
Step-by-step scheme of Stretch Ceiling installation
Now you need to mount the sheet itself. To do this correctly, you need to follow a clear scheme, without stepping back from it a single step:

- The canvas is unfolded and one of the corners is suspended in any corner of the room. This can be done without fixing it in the baguette, and using special clamps-clothespins. They are very similar to the mouth of a crocodile, so the specialists call it "crocodiles".
- Now all along the perimeter hangs all the corners of the canvas.
- Then the canvas is fastened to the canvas itself, but not from the corners, but in the center of each wall. The result is a kind of tent.
- Now go to the corners and fix the material in the baguettes. And, gradually moving to the center of the wall, insert the edges of the canvas into the baguette.
- Everything happens when the stretch ceiling is constantly warmed up.
- The final touch is the installation of a skirting board that will close the joint of the walls and the tension structure.
Harpoon method of fastening
Immediately specify that it can be used only for the installation of PVC sheets. Where does this name come from? The fact is that the connection involves two parts:
- The first - an aluminum profile, which is installed on the walls. There is a special groove in it.
- The second is a harpoon, a polymer (PVC) product that has a spike.
The fastening is carried out in the following way: the canvas is fixed in the profile and the harpoon is inserted into it. It snaps into place, and a durable and reliable connection is obtained.
Installation time
Many people who decided to install a stretcher, often ask questions about the time for the work.
As a rule, this factor depends on a number of parameters:
- method of lighting, which is planned in the room. For example, only one luminaire can be installed for up to 20-25 minutes;
- the amount of furniture in the room. If there are many, access to the walls will be complicated. As a consequence, the time for installation is extended;
- strength of walls. If a thick layer of plaster is applied on the surface, which does not hold the profile well, or the wall itself is "weak," additional spacers must be installed, and this time;
- height of ceilings. The greatest difficulty is caused by installation in rooms having a height of three meters or more. For such cases, the installation time is increased by an average of 60-90 minutes;
- number of pipes, corners, split-system, fire and house alarm;
- availability of material required for the work.
If we proceed from the average parameters, then it takes 4-5 hours to install the ceiling in a room of 20-25 square meters. If we are talking about ceilings with several levels and the need to install built-in lamps, then the time can be higher, because you have to spend time on wiring.
In any case, the total installation time, as a rule, does not exceed one day.
Installation of two-level stretch ceilings
Recently, two-level stretch ceilings are increasingly in demand, which replaced the obsolete drywall constructions. As a rule, the installation of such products is made after the work is completed.
At the same time, a number of requirements are imposed on the installation process:
- the profile should be mounted on a quality material - wood, plasterboard, concrete, brick, tile, aluminum and others;
- treat the pre-ceiling. You can not allow different rubbish to fall on the canvas;
- In advance, consider the wiring diagram and the place for mounting the fixtures;
- the execution of works is possible even with furniture. The main thing is that it should be moved away from the wall by at least 70-80 centimeters;
- It is important to take into account the thermal regime of the equipment installed in the tension structure.
As mentioned, the fastening of the two-level ceiling can be applied using a wedge or harpoon method. The second variant is more simple in execution, because of what is used more often. The main elements of harpoon fasteners are baguette, harpoon, rake and the canvas itself.
Before performing installation work, it is worthwhile to mount the wiring and tighten the wires to the mounting locations of the luminaire. In doing so, remember the danger of overheating the film. For luminous lamps, the maximum power is 60 W, for halogen-20 W, for incandescent - 60 W.
The creation of two levels can be done with plasterboard or only with the use of PVC film.
In the second case, you need to make a bar to fix the baguette.
On the perimeter of the room, fix the profile (always using the level).
Determining the distance of the indentation from the base surface, consider the type of luminaires that will be mounted in the canvas.
Immediately set the profile for the next level of the ceiling. As for fixing fixtures, the substrate must be prepared in advance. Fastening, as a rule, is made with the help of a pair of suspensions.
During the installation, a gas gun is needed, with which the room warms up to 60-75 degrees Celsius, after which the canvas is installed in the grooves of the profile.
When folds appear during the installation process, it is sufficient to warm them up. To install the film it is worth using a special spatula. Be careful not to damage the delicate construction.
Fastening of the second level is carried out on a similar principle. At the last stage, it is necessary to hide the slots with the help of a plastic cover. After cooling the air, lamps are installed.
The average time spent for installing such a structure (with a room area of 10-12 square meters) is 5-6 hours. If possible, it is worth watching a training video, which can reveal the basic subtleties of the work.